HowToQuick.Net is a local blog in the Philippines that talks about the latest tech news, promos, mobile phones, data plans, internet, tips and tricks.
In Windows XP Telnet client is enabled by default but in newer Windows like Windows 7 and Vista Telnet is not enabled. To use Telnet in Windows 7/ Vista all you need to do is ena…
Keep reading
In Windows XP Telnet client is enabled by default but in newer Windows like Windows 7 and Vista Telnet is not enabled. To use Telnet in Windows 7/ Vista all you need to do is ena…
In Windows XP Telnet client is enabled by default but in
newer Windows like Windows 7 and Vista Telnet is not enabled. To use Telnet in
Windows 7/ Vista all you need to do is enable first the telnet client by
following few steps below. Telnet command allows you to communicate to a remote
computer that is also using Telnet protocol.
How to Enable Telnet in Windows 7/Vista
1. Click on Start then Control Panel
2. On Control Panel click on Programs
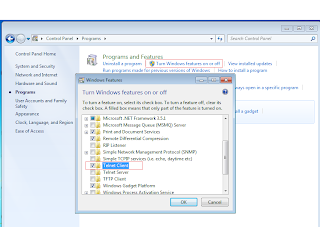
3. After clicking Programs, click Turn Windows feature on or off
in Programs and Features
4. A Windows Features menu will pop up, scroll down and look
for Telnet Client folder.
5. Mark check beside the Telnet Client folder to enable the
feature.
6. Please wait while the Windows makes changes to features. It
might take several minutes.
7. Once installed Windows Features menu will automatically
closed.
8. Test Telnet feature on your Windows 7 /Vista to confirm if
this feature is already enabled.
9. Go to Command Prompt by clicking Start>Run then or just
press Windows key + R then type cmd.
10. On Command Prompt type telnet /?
If it displays Telnet helps it means it is already enabled. (see first image above)
You may also read on How to Enable Run Command in Windows 7 and How To Safe Remove Usb Device on Windows 7.
You may also read on How to Enable Run Command in Windows 7 and How To Safe Remove Usb Device on Windows 7.


Comments